Difference between revisions of "DISK Documentation"
(→Welcome to the DISK Documentation!) |
(→Hypothesis Testing through DISK) |
||
| Line 20: | Line 20: | ||
Here is an example of a successful data query pattern: | Here is an example of a successful data query pattern: | ||
| − | [[File:Test-data-query-pattern.JPG|center| | + | [[File:Test-data-query-pattern.JPG|center|500px|alt=Test data query pattern]] |
Once we have all the relevant data files, we must specify a workflow to bind the inputs that we have retrieved and this can be done under the ''Workflows to Run'' section. This will allow us to automatically run our experiments with the data we have queried, by using a workflow on the WINGS portal. | Once we have all the relevant data files, we must specify a workflow to bind the inputs that we have retrieved and this can be done under the ''Workflows to Run'' section. This will allow us to automatically run our experiments with the data we have queried, by using a workflow on the WINGS portal. | ||
| Line 27: | Line 27: | ||
The completed LOI should look something like this: | The completed LOI should look something like this: | ||
| − | [[File:Example-LOI.JPG|center| | + | [[File:Example-LOI.JPG|center|500px|alt=Example LOI]] |
| Line 39: | Line 39: | ||
Click on the orange '+' button on the top right corner to create your own hypothesis using the terms declared previously. Click on Query to retrieve the data and trigger the appropriate workflow. Once triggered, it should look like this: | Click on the orange '+' button on the top right corner to create your own hypothesis using the terms declared previously. Click on Query to retrieve the data and trigger the appropriate workflow. Once triggered, it should look like this: | ||
| − | [[File:Triggered-LOI.JPG|center| | + | [[File:Triggered-LOI.JPG|center|500px|alt=Triggered-LOI]] |
The green check symbol denotes the successful execution of the workflow. The progress of the Workflow can be monitored on the WINGS portal [https://enigma-disk.wings.isi.edu/wings-portal/users/admin/test/executions here]. | The green check symbol denotes the successful execution of the workflow. The progress of the Workflow can be monitored on the WINGS portal [https://enigma-disk.wings.isi.edu/wings-portal/users/admin/test/executions here]. | ||
That's all there is to test your hypothesis! | That's all there is to test your hypothesis! | ||
Revision as of 04:53, 14 July 2020
Welcome to the DISK Documentation!
This page will include instructions on how to navigate through DISK, and test your own hypothesis!
The DISK portal can be found here.
Hypothesis Testing through DISK
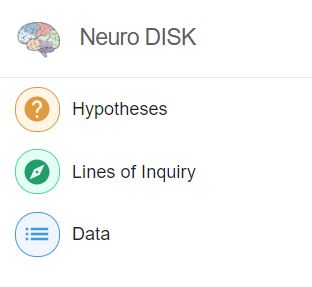
First, we must define a Line of Inquiry (LOI). A line of inquiry allows us to define a pattern for our hypothesis using variables, along with a data query to specify the type of data we require to test that hypothesis. We can define our Line of Inquiry here or by clicking on the Lines of Inquiry tab as shown here:
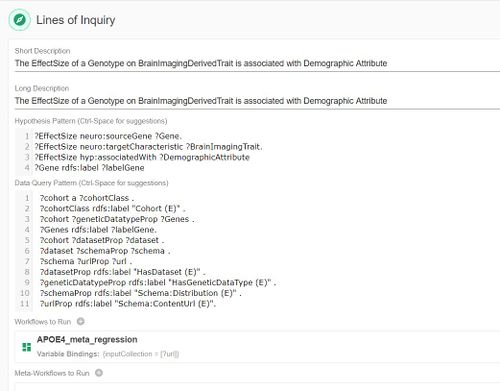
A template for a new line of inquiry should be displayed. We can define our hypothesis pattern and data query pattern using RDFS syntax.
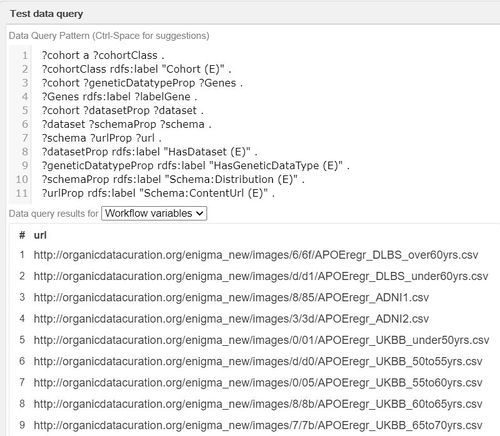
The data query pattern allows us to pull relevant data stored in the ENIGMA Wiki and use it to test our hypothesis. If done correctly, we can click on the Test button and check whether the appropriate data has been retrieved.
Here is an example of a successful data query pattern:
Once we have all the relevant data files, we must specify a workflow to bind the inputs that we have retrieved and this can be done under the Workflows to Run section. This will allow us to automatically run our experiments with the data we have queried, by using a workflow on the WINGS portal. To learn more about how to create your own workflow on WINGS, go here.
The completed LOI should look something like this:
After defining the LOI, we have to define the actual hypothesis to be tested by using specific terms instead of variables. We can declare these terms and their labels after clicking on the Data tab of the DISK portal, like shown:
Next, click on the Hypothesis tab to declare and test your hypothesis. It can also be found here.
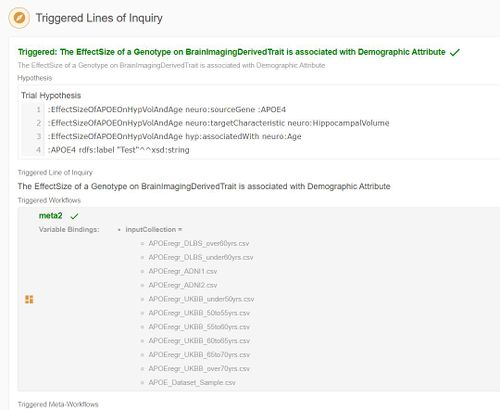
Click on the orange '+' button on the top right corner to create your own hypothesis using the terms declared previously. Click on Query to retrieve the data and trigger the appropriate workflow. Once triggered, it should look like this:
The green check symbol denotes the successful execution of the workflow. The progress of the Workflow can be monitored on the WINGS portal here.
That's all there is to test your hypothesis!
