Difference between revisions of "WINGS Workflow Documentation"
(→Welcome to the WINGS Workflow Documentation!) |
(→How to Create your own Workflow!) |
||
| (4 intermediate revisions by the same user not shown) | |||
| Line 5: | Line 5: | ||
[[File:Wings-logo.JPG|center|400px|alt=WINGSLogo]] | [[File:Wings-logo.JPG|center|400px|alt=WINGSLogo]] | ||
| − | To learn more about WINGS, check | + | ==About WINGS== |
| + | WINGS enables scientists to design computational experiments through the use of semantic workflows. It is easy to learn and users can build their own workflows to perform computations and test hypotheses. | ||
| + | |||
| + | ==How to Create your own Workflow!== | ||
| + | |||
| + | To build your own workflow, first go [https://enigma-disk.wings.isi.edu/wings-portal/users/admin/test/workflows/edit here]. | ||
| + | |||
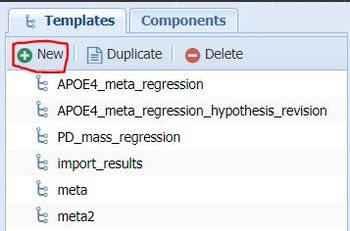
| + | At the top left corner under the ''Templates'' tab, click on New and enter the name of your new workflow. | ||
| + | |||
| + | [[File:New-workflow.JPG|center|350px|alt=New WINGS Workflow]] | ||
| + | |||
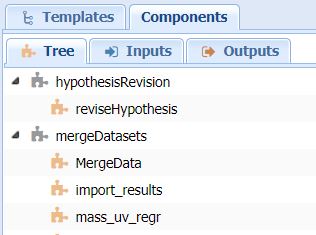
| + | Next, click on the ''Components'' tab on the top left. This will display all the available components which can be used. | ||
| + | |||
| + | [[File:Components.JPG|center|350px|alt=Components]] | ||
| + | |||
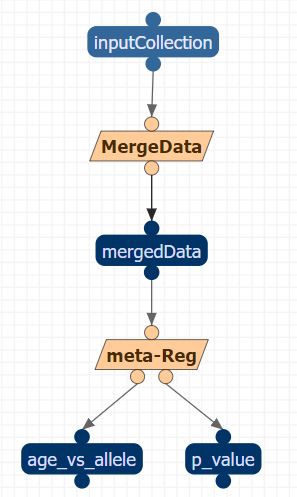
| + | Drag and drop the desired components onto the grid. The bubbles on the top and bottom of the components can be used to link the inputs and outputs of different components together. And that's it! The design of the workflow is done, and should look something like this: | ||
| + | |||
| + | [[File:Example-workflow.JPG|center|350px|alt=Example Workflow]] | ||
| + | |||
| + | Next, to run on the workflow, click on ''Run Workflow'' under the ''Analysis'' tab. Once you select your workflow from the left, you can specify the input files in the drop down boxes displayed as shown: | ||
| + | |||
| + | [[File:Workflow-inputs.JPG|center|900px|alt=Workflow inputs]] | ||
| + | |||
| + | Next, click on ''Plan and Run Workflow'' to run your workflow! To check the progress of the workflow, go to ''Access Runs'' under the ''Analysis'' tab. It can be found [https://enigma-disk.wings.isi.edu/wings-portal/users/admin/test/executions here]. | ||
| + | |||
| + | If the workflow is executed successfully, it should look something like this, with a green check symbol. | ||
| + | |||
| + | [[File:Access-runs.JPG|center|900px|alt=Access runs]] | ||
| + | |||
| + | To learn more extensively about WINGS, check out the website [https://wings-workflows.org here]. | ||
Latest revision as of 03:56, 14 July 2020
Welcome to the WINGS Workflow Documentation!
This page will include instructions on how to navigate through WINGS, and execute your own workflow.
About WINGS
WINGS enables scientists to design computational experiments through the use of semantic workflows. It is easy to learn and users can build their own workflows to perform computations and test hypotheses.
How to Create your own Workflow!
To build your own workflow, first go here.
At the top left corner under the Templates tab, click on New and enter the name of your new workflow.
Next, click on the Components tab on the top left. This will display all the available components which can be used.
Drag and drop the desired components onto the grid. The bubbles on the top and bottom of the components can be used to link the inputs and outputs of different components together. And that's it! The design of the workflow is done, and should look something like this:
Next, to run on the workflow, click on Run Workflow under the Analysis tab. Once you select your workflow from the left, you can specify the input files in the drop down boxes displayed as shown:
Next, click on Plan and Run Workflow to run your workflow! To check the progress of the workflow, go to Access Runs under the Analysis tab. It can be found here.
If the workflow is executed successfully, it should look something like this, with a green check symbol.
To learn more extensively about WINGS, check out the website here.


